
How to Get Your Google Maps Monthly Travel Recaps
Learn to enable Google Maps monthly travel recaps to see your journeys and visits, with step-by-step instructions and privacy tips. Discover what your recaps include and troubleshoot common issues.
Recaps are a fun way to reflect on your travels, and Google Maps offers monthly travel recaps that summarize your journeys and visits directly on your phone. In 2024, Google updated its location data storage for enhanced privacy, moving it primarily to your device instead of the cloud. This means you can no longer view your Timeline on the web or across multiple devices. As a result, Google has stopped sending monthly recap emails; now, you'll receive a notification directly within the Google Maps app, inviting you to view your latest recap. This guide will show you how to activate and receive these personalized insights, along with essential privacy tips. Get ready to explore your past adventures!
Prerequisites
To successfully receive your Google Maps monthly travel recaps, ensure you have the following:
- Google Maps App: Installed and updated on your Android or iPhone.
- Active Location History: Your device's location services and Google Account's Location History must be enabled for Google Maps to record your movements.
- Internet Connection: Required for initial setup and periodically to ensure data syncing and notification delivery.
Step-by-Step Guide: Enabling Google Maps Monthly Recaps
Step 1: Activate Your Google Maps Timeline
The foundation for your travel recaps is the Google Maps Timeline feature. If it's not already on, here's how to enable it:
-
Open Google Maps.
-
Tap your profile icon in the top right corner of the screen.
-
Select "Your Timeline."
-
If your Timeline is currently off, you’ll see a prompt floating over the map that says "Timeline is off." Tap on this message.
-
You'll be directed to your Google Account settings, specifically the Timeline section. Tap the prominent "Turn on" button. Read through the information page that appears, then tap "Turn on" once more to confirm your decision. Don't tap "Got it" just yet, as we have another important setting to adjust.
- Privacy Tip: Set Up Auto-Delete Immediately after enabling your Timeline, you'll notice a related control: "Set up auto-delete for Timeline." This is a crucial step for maintaining your privacy while still enjoying the recap feature. You have the option to automatically delete your location data after 3 months, 18 months, or 36 months. Choosing any of these options is better than never deleting your history, providing a good balance between insight and data control. Select the duration that best suits your comfort level.
Step 2: Enable Monthly Recap Notifications
With your Timeline active, the next step is to ensure you actually get notified when your monthly recap is ready.
- Return to the Maps home screen.
- Tap your profile icon again.
- From the menu, select "Settings," then scroll down and tap "Notifications."
- Within the Notifications section, tap on "Location and profile."
- Locate the setting titled "Google Maps timeline." Turn this toggle to "On" to receive push notifications. Alternatively, if you prefer to only see the notification appear when you open the app, you can set it to "App only."
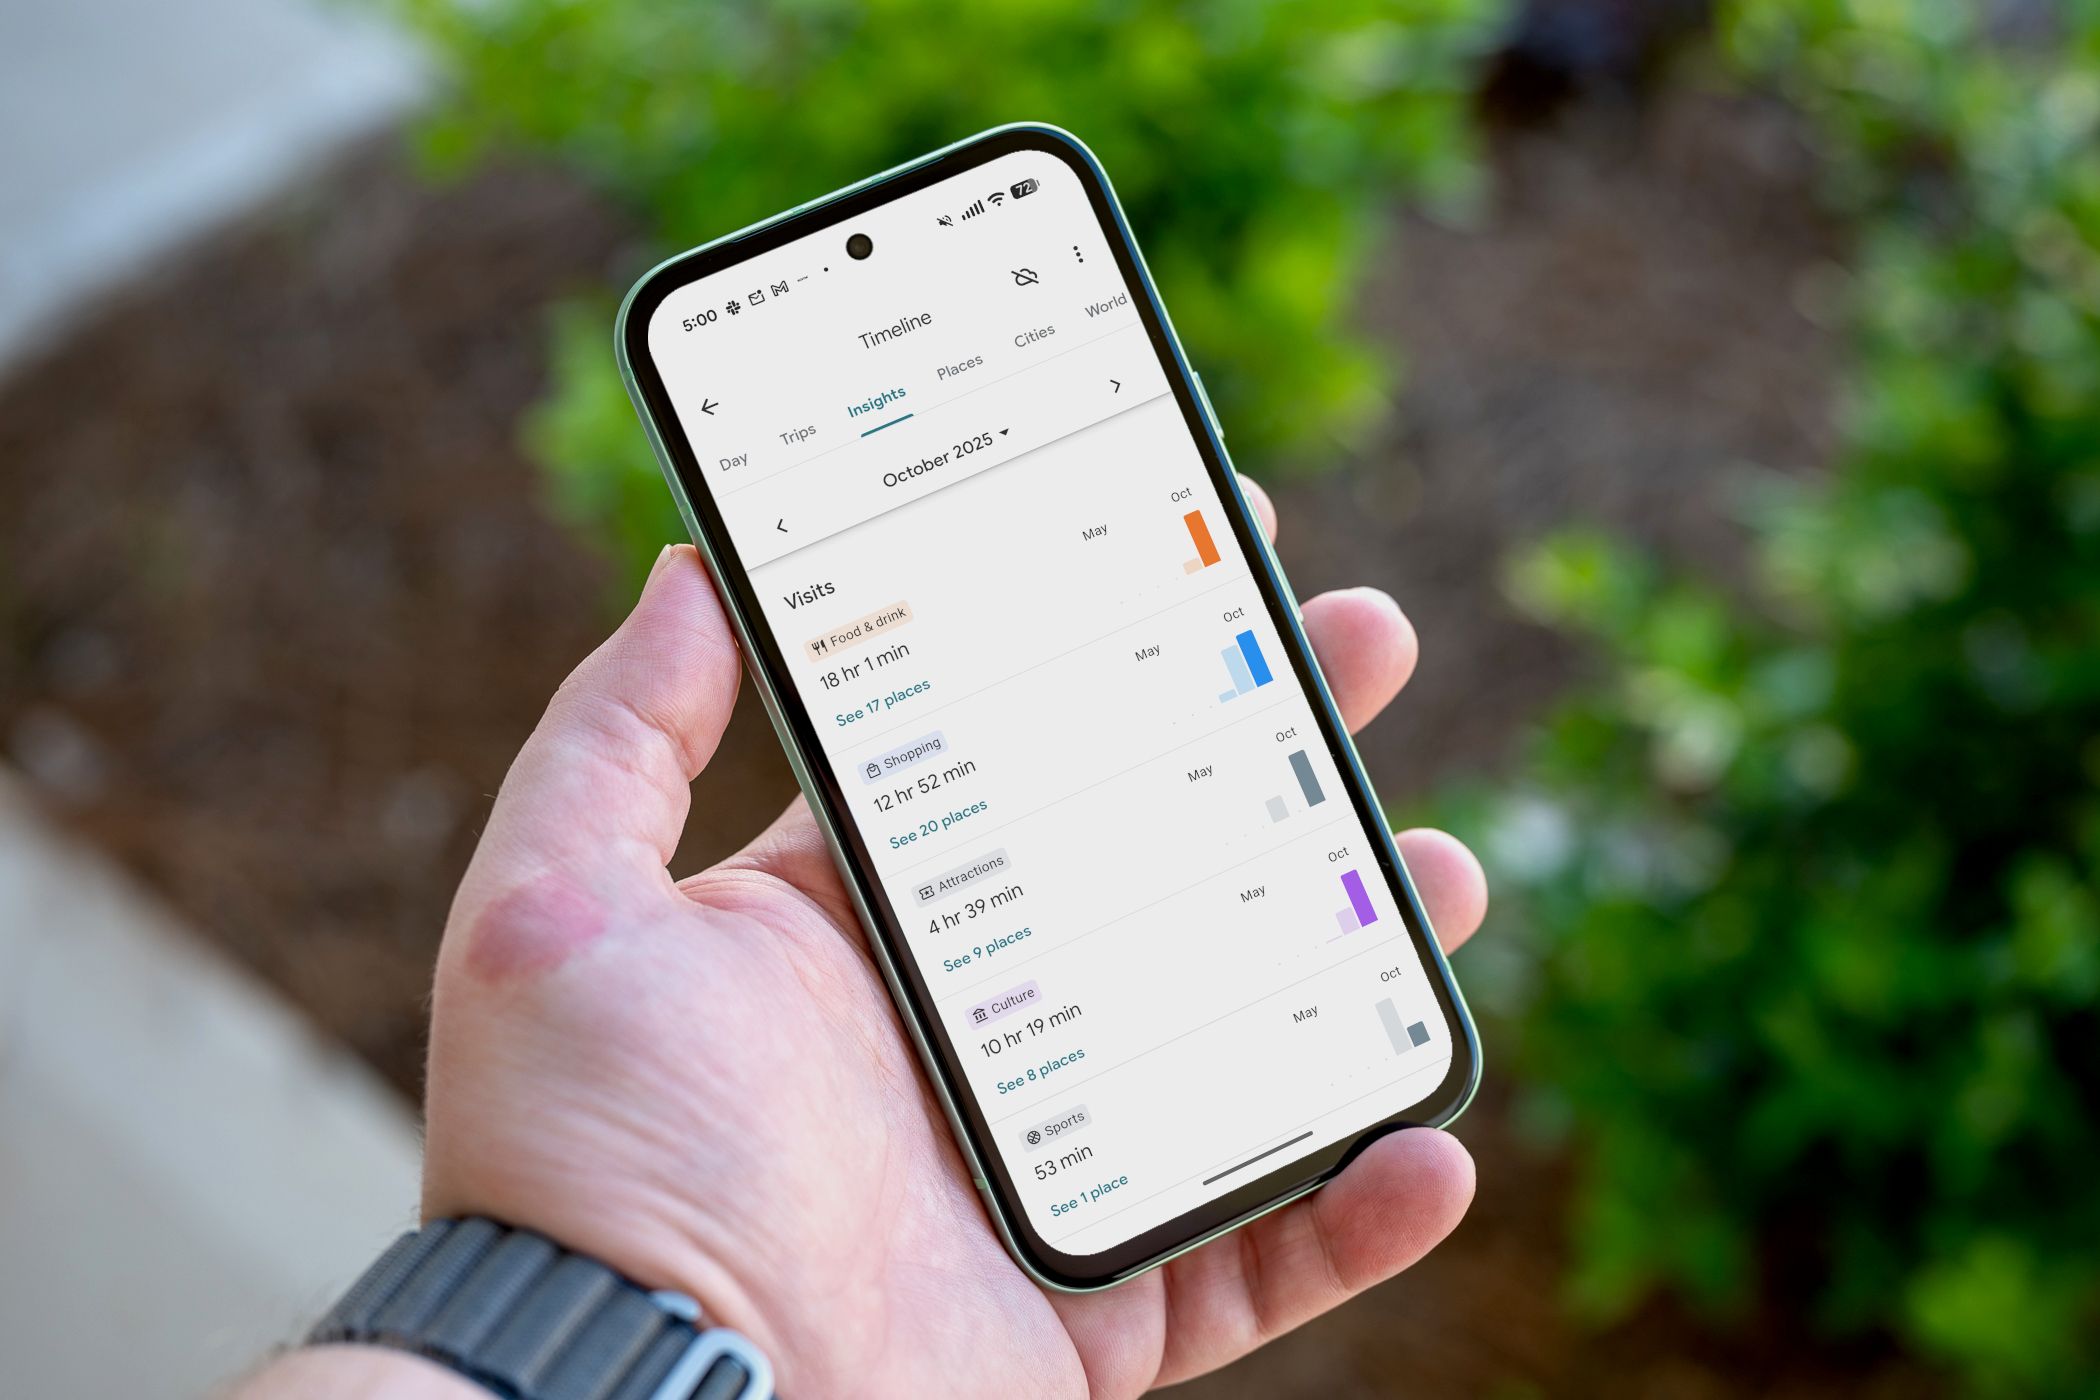
Now, you’re all set! When your monthly recap is ready, you'll receive a notification titled "Your [Month] Timeline: See new travel & visit insights." Tapping this notification will take you directly to the "Insights" tab within your Timeline, with the past month's data pre-selected for your review. You can also manually access this screen anytime by navigating through your profile icon > Your Timeline > Insights, and then using the month drop-down selector.
What Your Monthly Recap Includes
Once enabled, your Google Maps monthly recap offers a detailed summary of your movements:
- Travel Section: The top part shows miles covered by walking, driving, cycling, public transit, and more. Bar graphs compare current activity to past months.
- Visits Section: This lists categories of places you visited (e.g., "Food & Drink," "Shopping," "Attractions"). It displays time spent in each, with an option to "See places" for specific locations. Bar graphs also show comparisons.
- Highlights Section (if applicable): For active months, this section points out noteworthy activities, like "You visited 3 bars in September," highlighting changes from previous months.
These recaps offer a fascinating personal snapshot, easily accessible via monthly notifications.
Troubleshooting Tips
-
"I haven't received a recap notification."
- Verify Settings: Double-check that "Your Timeline" (Step 1) and "Google Maps timeline" notifications (Step 2) are enabled.
- Location History: Ensure your device's location services and Google Account's Location History are active.
- Patience: If newly enabled, allow a full month for your first recap to compile.
-
"My recap data seems inaccurate or incomplete."
- High Accuracy Location: Set your phone's location settings to high accuracy.
- App Usage: Regularly opening Google Maps and granting background location permissions helps improve data collection.
-
"Can I access old recaps or view them on other devices?"
- Due to Google's 2024 shift to on-device storage, Timeline data and recaps are generally only viewable on the collecting device. Older cloud-based recaps (pre-2024) are not accessible via this new app system.
Next Steps
Now that you know how to get your monthly travel recaps, feel free to explore your Timeline further. You can manually browse your history by day, week, or month, and even edit places or activities if something was misidentified. Regularly reviewing your auto-delete settings is also a good practice to manage your data privacy effectively. Enjoy reflecting on your journeys and discovering new patterns in your movements!
FAQ
Q: Why did my monthly recap emails stop?
A: Google stopped sending recap emails after a 2024 privacy update. Location data is now primarily stored on your device, with recaps delivered as in-app notifications.
Q: Can I see recaps from previous years or on other devices?
A: With on-device storage, recaps are generally accessible only on the specific device that collected the data. Old cloud-based recaps (before 2024) are not available through this new app system.
Q: How can I improve the accuracy of my Google Maps recaps?
A: Ensure your phone's location services are set to high accuracy and that Google Maps has background location permissions. Regularly opening the app also helps gather comprehensive data.
Related articles
Give Your Old Android a New Life: 7 Free Apps to Repurpose It
Repurpose your old Android phone with 7 free apps to create a webcam, dash cam, e-reader, and more, saving money and reducing waste.

How to Reimagine the World with Nano Banana 2 in Google Earth
Learn to use Nano Banana 2 AI in Google Earth on the web to generate historical scenes, futuristic landscapes, or personal design visualizations with text prompts.

Google Flow Sessions & Flow: Elevating AI Filmmaking Beyond 'Slop
Verdict: AI as a Catalyst for Artistic Vision Google Labs' Flow Sessions and the underlying Google Flow generative AI tool represent a compelling counter-narrative to the prevailing skepticism surrounding AI in creative

TechCrunch Disrupt 2026: AI Stage Tackles SaaS Reckoning, Security
TechCrunch Disrupt 2026, held Oct 13-15 in San Francisco, features an AI Stage presented by Google for Startups. It will explore how AI is reshaping business models, creating security gaps like the 'agent security gap,' and pioneering new job categories like the 'GTM Engineer.' Industry leaders will share insights on topics from enterprise AI security to the future of video intelligence.
LosslessCut: Effortless Video Trimming Without Re-encoding
Learn to quickly trim and merge video segments without quality loss using LosslessCut, a free, open-source tool. This guide covers installation, step-by-step usage, key limitations, and troubleshooting tips for efficient video management.

Unpacking the Catch in Apple's New Upgrade Program
Apple's new Upgrade program offers seemingly low monthly payments for iPhones, iPads, Macs, and Watches, but our analysis reveals significant catches. While it provides accessibility, users face risks like potential debt collection for missed payments and loss of device resale value, making careful consideration essential.