
How to Integrate Local AI Images in Obsidian for Visual Notes
Learn to enhance your Obsidian notes with personalized, locally-generated AI images in seven steps, transforming text-heavy content into a visually rich, private knowledge vault that engages both your verbal and visual thinking.
Are your Obsidian notes feeling a bit flat, overwhelmed by endless text? While Obsidian excels with its graph view, bidirectional linking, and plain-text approach, relying solely on words can sometimes limit how you connect with your knowledge. What if you could bring your ideas to life with unique, personalized images, generated locally and privately, without a subscription?
This guide will show you how to transform your Obsidian note-taking system by integrating it with a local AI image generator. You’ll learn to create a powerful personal knowledge management (PKM) workflow that engages both your verbal and visual thinking, making complex concepts more tangible and your vault feel more like a mind than a filing cabinet.
Why Visuals Elevate Your Notes
Even if you spend most of your time writing, purely verbal thinking isn't always the most effective way to process information. When grappling with intricate projects, developing story characters, or internalizing abstract concepts, a thoughtfully placed image can serve as a powerful anchor. It offers your brain a 'handle' that paragraphs or bullet points simply can't provide, making the idea immediately more accessible.
Traditional methods of adding visuals—like scouring the web, using stock photos, or taking screenshots—often fall short. They can feel impersonal, representing someone else's interpretation rather than your own unique vision. Plus, managing external image files can be a time-consuming chore. This method offers a way to generate the exact image you envision, instantly and within your workflow, making your notes truly personal.
Prerequisites: What You'll Need
Before we dive into the steps, ensure you have the following ready:
- Obsidian: Your note-taking hub, already installed and set up.
- Local AI Image Generator:
- For Mac users: Diffusers from Hugging Face. This free, open-source app is available in the Mac App Store. It's optimized for Apple Silicon's Metal GPU, offering surprisingly fast generation on consumer hardware. When prompted upon first opening, download a Stable Diffusion model. For M3 or M4 Macs with 16GB+ memory, Stable Diffusion 3 Medium offers the best photorealistic results. For older Macs, Stable Diffusion 2.1 is a reliable choice.
- For Windows users: Consider ComfyUI (features a node-based visual interface and a one-click installer) or Automatic1111 (provides a more traditional web UI). While excellent, note that they aren't optimized for Apple Silicon like Diffusers is.
- Crucial Requirement: Whichever tool you choose, ensure it runs entirely on your local machine. This is fundamental to keeping your notes and generated images private and secure, defeating the purpose if routed through cloud services.
- Obsidian's Templater Plugin: We'll install this free plugin as part of the process to streamline prompt creation.
Step-by-Step Guide: Visualizing Your Obsidian Notes with Local AI
Here’s how to seamlessly integrate your local AI image generator with Obsidian.
1. Prepare Your Note in Obsidian
Start by writing your notes as you normally would. Focus on articulating your ideas and concepts thoroughly. Aim for at least a paragraph describing the concept or node you're working on. This foundational writing is crucial because it helps you clarify what the image should convey, leading to a much better prompt. A vague prompt will result in a vague image.
2. Set Up Your Local AI Image Generator
If you haven't already, download and install your chosen local AI image generator (Diffusers for Mac, or ComfyUI/Automatic1111 for Windows). For Mac users with Diffusers, launch the app and download your preferred Stable Diffusion model as instructed in the prerequisites section.
3. Install Obsidian's Templater Plugin
This free plugin simplifies prompt creation:
a. Open Obsidian Settings.
b. Navigate to Community Plugins.
c. Click Browse and search for "Templater."
d. Select it, click Install, then Enable.
4. Create Your Image Prompt Template
To standardize your image prompts, create a dedicated template:
a. In your Obsidian vault, create a new folder named Templates.
b. Inside the Templates folder, create a new note titled Image Prompt Template.
c. Add the following structure to this new template note:
Subject:
Mood/atmosphere:
Colors:
Style: hyper-detailed, cinematic
Negative prompt:

*Tip:* The `Style` can be customized (e.g., photorealistic, impressionistic, watercolor). The `Negative prompt` tells the AI what to actively avoid in the generated image.
5. Generate a Prompt within Obsidian
Now, you can easily insert and fill out your image prompt template:
a. Open the Obsidian note where you want to add an image.
b. Go to Templater's settings (under Community Plugins) and set a convenient Template Hotkey for your Image Prompt Template.
c. In your note, use your hotkey. A small window will appear. Type "Image" to find your Image Prompt Template, then press Enter. This inserts the template structure into your note.
d. Fill in the blanks with details specific to your note. For example:
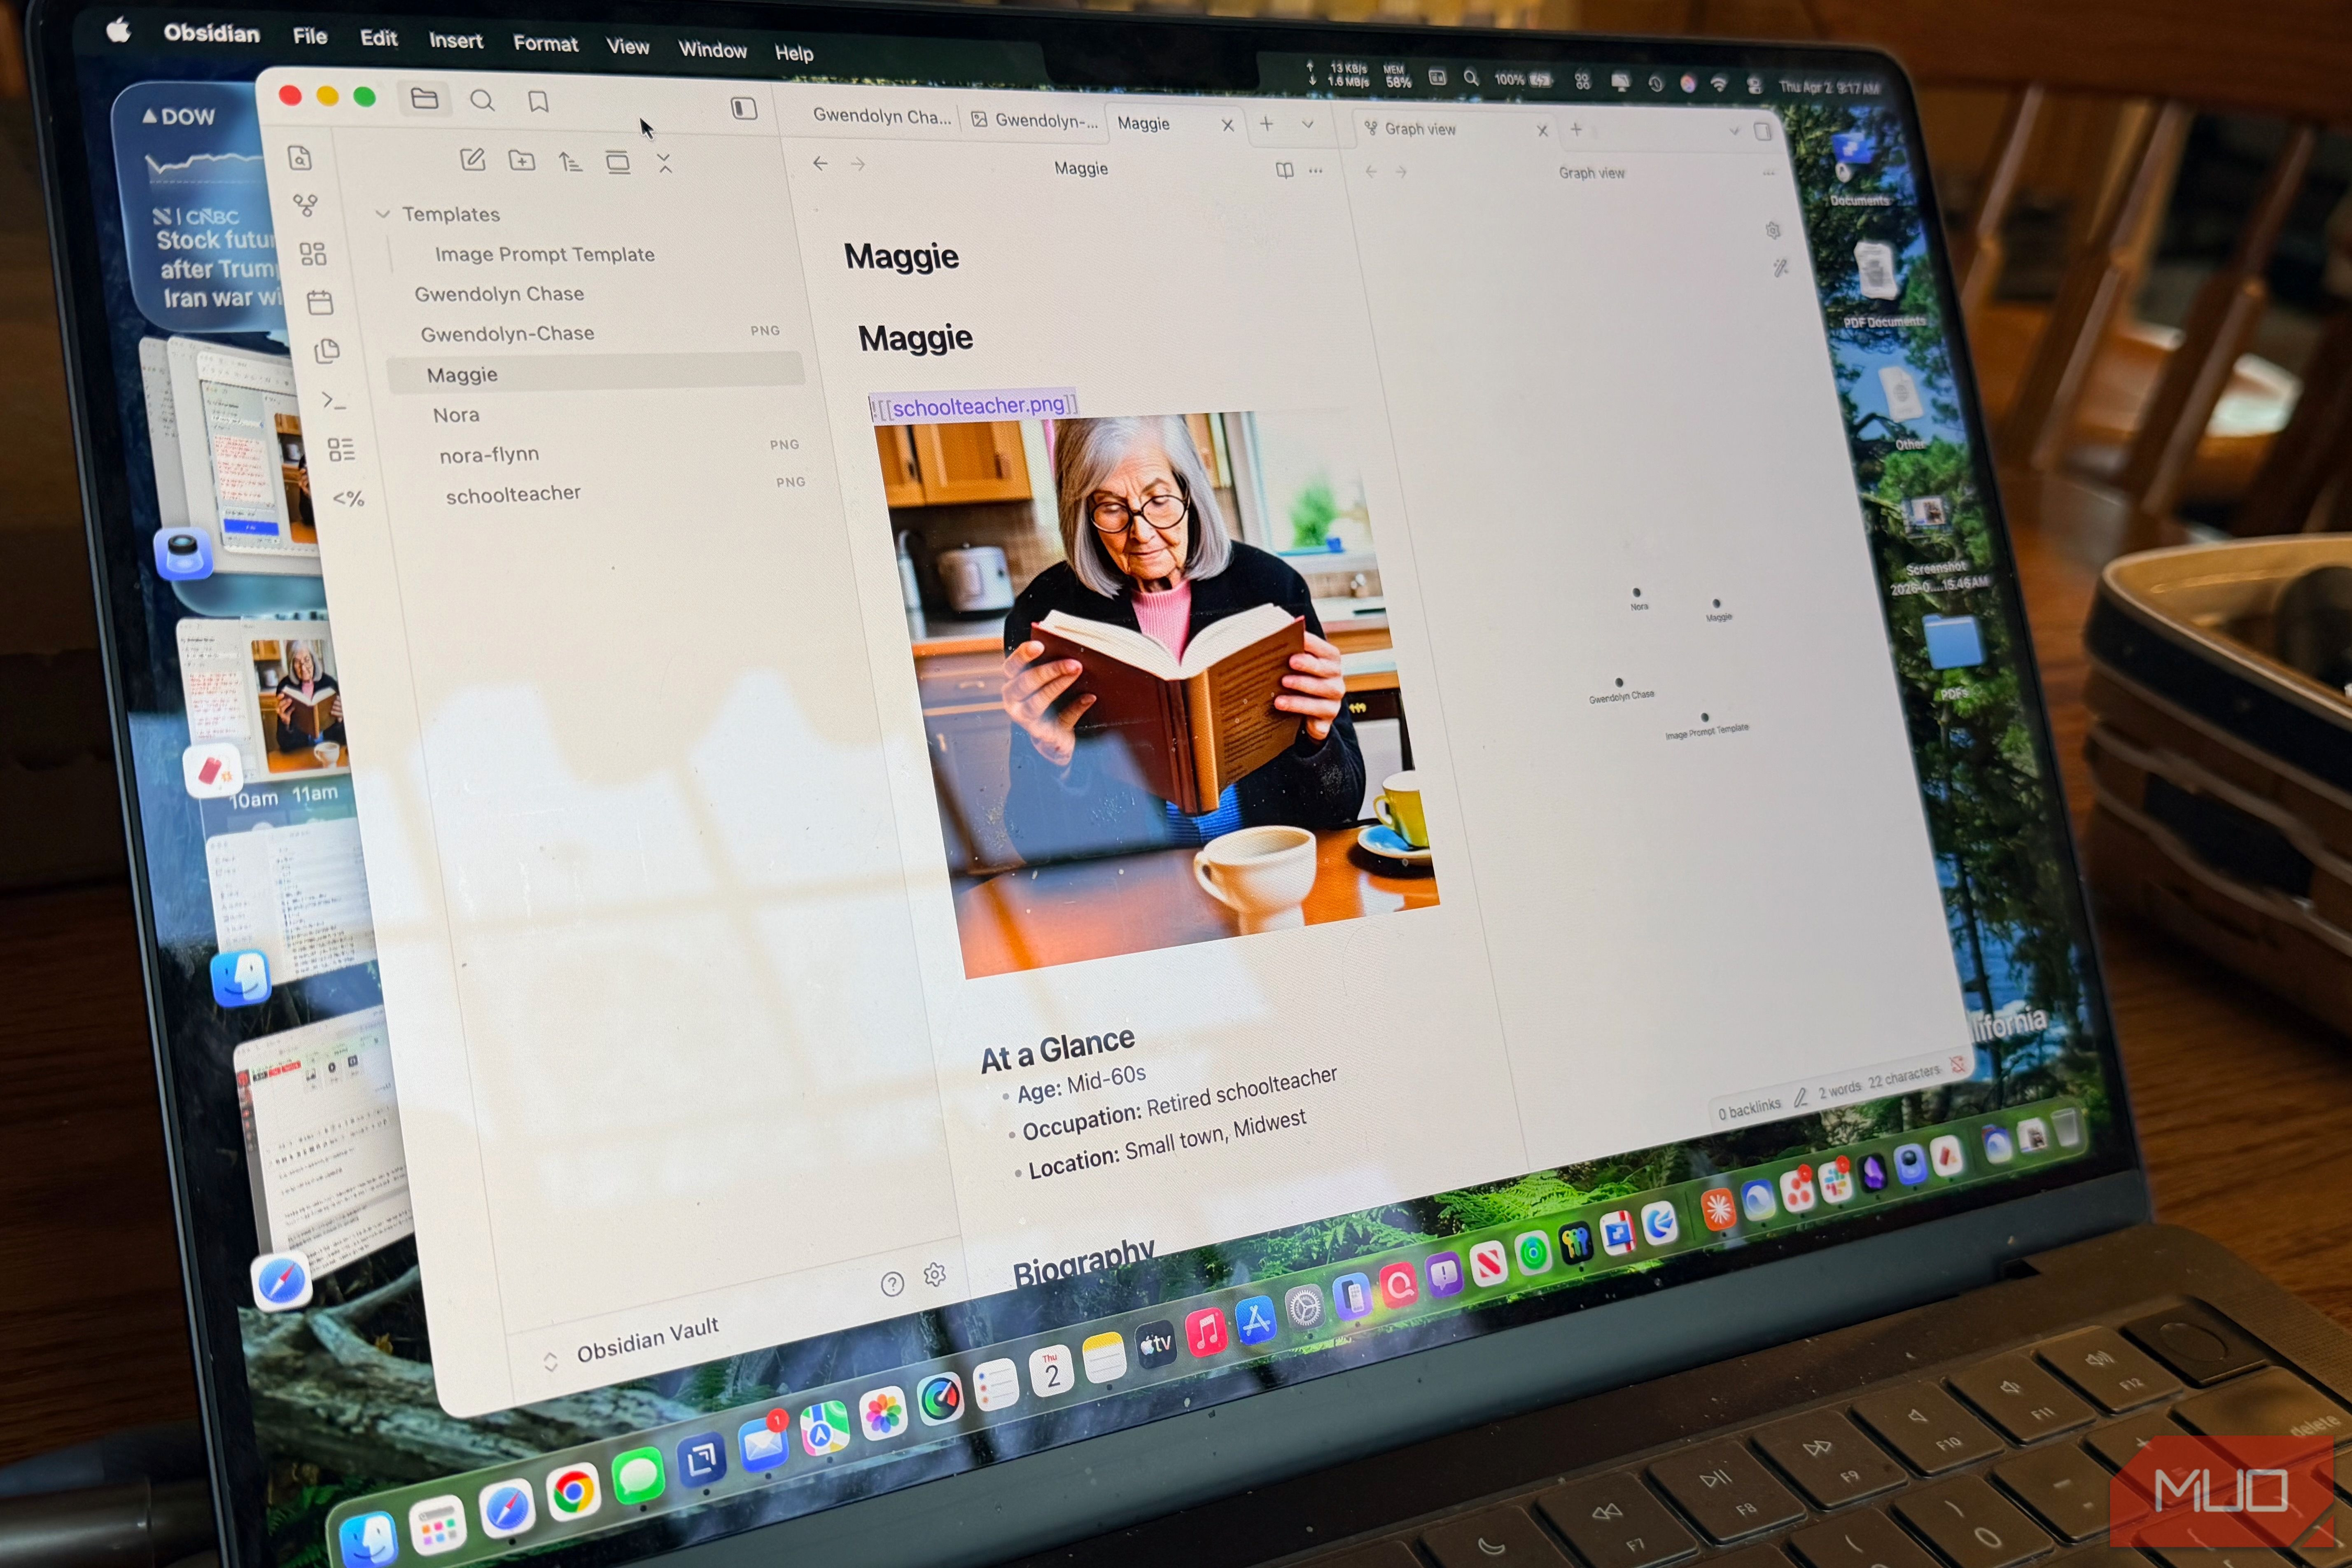
*   **Subject:** `a retired schoolteacher in her mid-60s, silver hair pulled back loosely, reading glasses pushed up on her forehead, sitting at a kitchen table with a cup of tea`
*   **Mood/atmosphere:** `quietly content, unhurried, the feeling of a Sunday morning with nowhere to be`
*   **Colors:** `warm cream, soft morning light, muted sage green`
*   **Style:** `hyper-detailed, cinematic, photorealistic`
*   **Negative prompt:** `blurry, low quality, cartoon, watermark, text, deformed hands, young, glamorous, dramatic lighting`
6. Bring Your Prompt to the AI App and Generate
a. Copy your complete prompt from your Obsidian note (including both the positive and negative parts).
b. Switch to your local AI image generator (e.g., Diffusers).
c. Paste the main prompt into the designated Prompt text box.
d. Paste the Negative prompt content into the Negative Prompt box.
e. Click Generate. It's often beneficial to generate two or three variations to find the best composition, as initial results can sometimes be unexpected. With practice, your prompting skills will improve, speeding up this process.
7. Save and Embed Your Image in Obsidian
To keep your vault organized and your images accessible:
a. Create an assets folder in the root of your Obsidian vault, and inside it, an images subfolder (e.g., /assets/images/).
b. Save your preferred generated image into this /assets/images/ folder. Give it a descriptive name (e.g., schoolteacher.png).
c. Finally, embed the image at the top of your Obsidian note by adding ![[schoolteacher.png]] (replacing schoolteacher.png with your file's name). Upon opening the note, this image will immediately set the tone and context before you read a single word.
Troubleshooting Tips
- Poor image quality: If the initial images aren't what you envisioned, refine your prompt. Add more descriptive adjectives, specify lighting, or try different styles. Generate several variations to find one that aligns better.
- Slow generation: Ensure your hardware meets the recommended specifications for your chosen AI model. For Mac users, confirm Diffusers is leveraging Apple Silicon's Metal GPU. If performance is an issue, consider using a less demanding Stable Diffusion model (e.g., SD2.1 instead of SD3 Medium).
- Privacy concerns: Reconfirm that your chosen AI image generator processes everything locally on your machine. This setup is specifically designed to maintain the privacy of your notes and ideas.
Tips for Better Visual Notes
- Iterate on Prompts: Don't be afraid to experiment and refine your prompts. The more you practice, the better you'll become at guiding the AI to produce desired results.
- Explore Obsidian Plugins: Plugins like Kanban and Dataview can be configured to display embedded images, transforming your vault navigation into a visually rich experience, almost like browsing a magazine rather than a spreadsheet.
- Think Creatively: This setup truly shines for creative projects, allowing you to visualize characters, settings, or abstract concepts instantly. While it might not make you 'faster' at writing notes, it undeniably makes them 'better' and more engaging in the long run.
FAQ
Q: Is this method only useful for creative writing or artistic projects?
A: While exceptionally beneficial for creative endeavors like story building or character development, this approach also helps in mapping complex projects or internalizing abstract concepts in any field. The goal is to anchor ideas visually, making them more memorable and personally resonant, regardless of the subject matter.
Q: Do I need a super powerful computer to use a local AI image generator?
A: Not necessarily, but better hardware does improve performance. For Mac users, Apple Silicon with 16GB or more of memory (M3/M4 for Stable Diffusion 3 Medium) provides optimal results. Older Macs or those with less memory can still use Stable Diffusion 2.1 reliably. Windows alternatives like ComfyUI and Automatic1111 also have varying hardware requirements, but generally, a dedicated GPU significantly speeds up generation.
Q: Why is it so important that the AI image generator runs locally?
A: Running the AI locally ensures complete privacy for your notes and ideas. Your prompts and generated images never leave your machine, preventing any data from being sent to or stored on external cloud servers. This maintains the integrity of your personal knowledge vault and aligns with Obsidian's plain-text, local-first philosophy.
Embrace a More Visual Knowledge Vault
If your notes have felt too flat, too text-heavy, or disconnected from how you truly think, dedicating an afternoon to this setup is a worthwhile investment. This approach won't necessarily make you more productive in a traditional sense by helping you write faster or capture more notes quickly. Instead, it profoundly changes how deeply you engage with individual notes, cultivating a stronger sense of authorship and making your notes richer over the long term. Your Obsidian vault doesn't have to be a mere filing cabinet; with a local image generator and a few minutes of creative prompting, it can evolve into something much closer to your own mind.
Related articles
How to Understand and Benefit from Kindle's User-Replaceable Battery
Learn how Kindle's upcoming user-replaceable battery design, driven by new EU laws, will enhance device longevity, ease repairs, and reduce e-waste for future models rolling out worldwide from Q3 2026.

How to Discover and Stream the Year's Top 10 Movies (So Far)
Discover and easily stream the top 10 most-watched movies of the year so far, based on JustWatch streaming data. Get descriptions, platforms, and tips for an optimal viewing experience in simple steps.
Master Excel PivotTables: Summarize Data with Ease
Learn to create, customize, and analyze data with Excel PivotTables in simple, step-by-step instructions. Discover how to prepare your data, use the PivotTable Fields pane, and apply interactive filters like slicers for instant insights. Gain control over large datasets and generate clear reports effortlessly.

Google Maps 3D Immersive View: A Game-Changer for Android Auto
Google Maps 3D Immersive View: A Game-Changer for Android Auto Navigation Verdict: Google Maps' new 3D Immersive View on Android Auto isn't just a visual upgrade; it's a transformative leap in navigation that genuinely
Remove Ads from Windows 11 Search for a Clearer Experience
Learn how to remove unwanted ads and promotional content from the Windows 11 search box by adjusting new privacy settings. This guide provides step-by-step instructions to achieve a cleaner, more focused search experience, part of Microsoft's broader effort to improve Windows 11 quality.
OpenClaw Machines: Scaling Enterprise AI Agents with Bare Metal
OpenClaw Machines offers an open-source, self-hosted platform for running AI agents with enterprise-grade security and cost efficiency. It utilizes Firecracker microVMs for hardware isolation on your own Linux servers, providing full data sovereignty and predictable costs, especially at scale. The platform includes a control plane for orchestration, a Cloudflare data plane for secure access, and integrated LLM proxying.