
How to Make Your Home Safer with Home Assistant This Weekend
Learn to enhance your home's safety with three essential Home Assistant projects this weekend, from emergency automation to building your own security system.

How to Make Your Home Safer with Home Assistant This Weekend
Home Assistant offers a fantastic way to personalize your smart home experience, making it not just convenient but also significantly safer. This weekend, why not dive into some projects that can fortify your home's defenses and give you greater peace of mind? We've put together three essential, safety-focused Home Assistant projects you can tackle over the next few days. From setting up crucial emergency responses to building your own comprehensive alarm system, these guides will help you leverage your existing smart devices to create a more secure living environment. Let's get started!
Project 1: Develop an Emergency Response Automation
A smart smoke alarm is a powerful tool, but its full potential is unlocked when it triggers a comprehensive emergency response in your Home Assistant setup. This project ensures that if the worst happens, your home takes immediate, coordinated action to protect you and your loved ones.
Prerequisites:
- A smart smoke alarm already integrated and reporting to Home Assistant.
Step 1: Identify Your Emergency Trigger The foundation of this automation is your smart smoke alarm. When it detects smoke and triggers its alarm, Home Assistant should recognize this event. Ensure your smoke alarm's status changes within Home Assistant when it goes off, as this will be the trigger for your automation.
Step 2: Alert Everyone in the House Once the smoke alarm activates, immediate notification is paramount. Configure Home Assistant to simultaneously alert everyone in the house.
- Critical Alerts: Send high-priority notifications to all your smart devices (phones, tablets).
- Visual Cues: Flash all smart lights on and off at full brightness.
- Audible Warnings: Have your smart speakers play a loud siren sound or deliver a clear, full-volume spoken announcement that smoke has been detected.
- External Notification (Optional): Consider sending an alert to a trusted neighbor who might be able to offer assistance or check in.
Step 3: Implement Safety-Focused Actions Beyond alerting, your smart home can take proactive steps to aid in an emergency, especially at night.
- Illuminate Escape Routes: If it's dark, switch all lights to full brightness to help residents find their way out.
- Facilitate Exit: Automatically unlock all exterior smart doors to ensure the quickest possible escape.
- Contain Smoke Spread: Shut down your HVAC system and any other devices that circulate air. This can significantly reduce the spread of smoke throughout your home.
- Power Down: Consider shutting off power to non-essential devices to prevent further hazards or conserve energy.
Step 4: Test Your Emergency Automation Thoroughly It's absolutely vital to test your emergency automation. Simulate a smoke alarm trigger (if your alarm supports it, or temporarily set up a dummy trigger) and observe if every action you configured performs as expected. Discovering a flaw during a real emergency is the last thing you want, so rigorous testing is key to ensuring reliability.
Project 2: Smartify Your 'Dumb' Smoke Alarm
Don't have a smart smoke alarm but still want to be alerted when your existing 'dumb' one goes off? Home Assistant allows you to replicate this feature, often found in subscription-based smart home ecosystems, giving your traditional smoke alarm a new level of intelligence.
Prerequisites:
- An existing, audible smoke alarm.
- **Option
A: ** An Ecolink Firefighter audio sensor.
- Option B: A microphone integrated into your Home Assistant environment, and the ability to install custom components/software.
Step 1: Choose Your Detection Method You have two primary ways to enable your Home Assistant system to 'listen' for your smoke alarm.
**Option
A: Deploy a Dedicated Audio Sensor** This is often the simpler, plug-and-play approach.
- Acquire Sensor: Purchase a dedicated device like the Ecolink Firefighter audio sensor. These sensors are specifically designed to listen for the distinct sound of a smoke alarm.
- Integrate and Automate: Connect the sensor to your Home Assistant setup. Once integrated, the sensor's status (detecting a smoke alarm sound) can directly trigger an automation, similar to how a smart smoke alarm would. This automation could then send alerts to your devices or trigger other safety actions.
Option B: Build Your Own Audio Classifier For a more DIY approach, you can turn a regular microphone into a sophisticated listening device.
- Set Up a Microphone: Ensure you have a microphone connected and accessible to your Home Assistant server or another device that can stream audio to it.
- Install AudioClassifier-MQTT: This tool classifies live audio from a chosen microphone. Install it in your environment.
- Utilize YAMNet: Configure AudioClassifier-MQTT to use the YAMNet audio event classifier. YAMNet is capable of recognizing 521 different audio events, including the specific sound of a smoke alarm.
- Publish via MQTT: Set up AudioClassifier-MQTT to publish its classifications (e.g., "smoke alarm detected") via MQTT. MQTT acts as a bridge, allowing Home Assistant to receive these classifications.
- Integrate with Home Assistant: In Home Assistant, subscribe to the MQTT topic where the classifications are published. Create an automation that triggers when Home Assistant detects a "smoke alarm" classification from the microphone. This automation can then send alerts or initiate other emergency procedures.
Project 3: Assemble Your Own Home Security System
Ready-made smart home alarm systems often come with subscriptions and reliance on cloud services. With Home Assistant, you can bypass these by building a robust, custom alarm system using sensors you likely already own or can acquire affordably.
Prerequisites:
- Home Assistant instance up and running.
- One or more contact sensors (for doors/windows) integrated into Home Assistant.
- One or more motion detectors integrated into Home Assistant.
Step 1: Gather Your Sensors Your existing contact sensors and motion detectors are the building blocks of your DIY alarm system. These are typically inexpensive and widely available.
- Door and Window Security: Position contact sensors on exterior doors and windows.
- Interior Monitoring: Place motion detectors in key areas within your home where intruders might pass.
- Sensor Type Consideration: While most smart home sensors will work, for an alarm system, you might consider Z-Wave sensors. Although potentially more expensive, they often provide superior range and are less susceptible to interference, leading to greater reliability.
Step 2: Install the Alarmo Custom Component Replicating the complex functionality of a proprietary alarm system with individual automations can be daunting. Fortunately, the Home Assistant community has developed a solution.
- Get Alarmo: Install the 'Alarmo' custom component through HACS (Home Assistant Community Store). This component is designed specifically to help you create and manage a comprehensive home security system.
Step 3: Configure Your Alarm System with Alarmo's GUI Alarmo provides a user-friendly Graphical User Interface (GUI) that simplifies the setup process.
- Add Sensors: Use the GUI to easily add all your contact sensors and motion detectors to your new alarm system.
- Set Delays: Configure entry and exit delays. For example, a delay might give you a few seconds to disarm the system after opening the front door before the alarm triggers.
- Define Actions: Specify what actions Home Assistant should take when the alarm is triggered. This could include:
- Sounding a siren on smart speakers.
- Flashing lights.
- Sending notifications to your devices and/or trusted contacts.
- Customize Modes: Set up different alarm modes (e.g., 'Away,' 'Home,' 'Night') that activate different sets of sensors or actions.
Step 4: Create a Dashboard for Control For easy arming and disarming, Alarmo includes a custom card.
- Display Dashboard: Add the Alarmo custom card to a Home Assistant dashboard.
- Physical Access: Consider displaying this dashboard on a wall-mounted tablet near your front door. This allows for convenient arming when you leave and disarming when you return, mimicking traditional alarm keypads.
Important Note: While a DIY system offers flexibility and cost savings, it might not achieve the same reliability as a dedicated, professionally wired alarm system. However, a well-configured DIY security system is a significant improvement over having no security system at all, providing a valuable layer of protection for your home.
Troubleshooting and Best Practices
- Test, Test, Test: For any safety-related automation, regular testing is crucial. This ensures everything works as expected when you need it most.
- Start Simple: If you're new to Home Assistant automations, begin with basic actions and gradually add complexity.
- Review Logs: If an automation isn't triggering correctly, check your Home Assistant logs for errors or unexpected sensor states.
- Community Support: The Home Assistant community forums are an excellent resource for help with custom components like Alarmo or complex automations.
Frequently Asked Questions
Q: Do I need to buy expensive new hardware for these projects?**
A: Not necessarily! Many of these projects leverage sensors you might already own (like contact sensors and motion detectors). For smoke alarm detection, you can either buy a dedicated sensor (like Ecolink Firefighter) or repurpose an existing microphone with software like AudioClassifier-MQTT, making it quite flexible.
Q: How reliable are DIY Home Assistant security systems compared to professional ones?**
A: While a DIY Home Assistant system offers immense flexibility and avoids subscriptions, it generally won't match the dedicated reliability of a professionally installed, wired alarm system. However, it provides a valuable and customizable layer of security that is significantly better than having no system at all. Regular testing and using reliable sensors (like Z-Wave) can improve its performance.
Q: Can I combine these projects?**
A: Absolutely! In fact, combining them enhances your home's safety. For instance, your 'smartified' smoke alarm (Project 2) can act as a trigger for your comprehensive emergency automation (Project 1). Similarly, the sensors used in your DIY alarm system (Project 3) can contribute to other safety automations or provide general home monitoring.
Home Assistant empowers you to transform your home into a smarter, safer environment. These three projects are an excellent starting point for enhancing your home's security and emergency preparedness this weekend. By taking the time to set them up, you're not just creating automations; you're building peace of mind. Dive in, experiment, and enjoy the magic of a truly responsive smart home!
Related articles
Best Verizon Plans 2026: Navigating Your Wireless Future
Verizon has been shaking things up, introducing price adjustments and a new 'Simplicity' plan in late 2025 and early 2026. Their approach remains distinct: optional perks allow for customization, but this flexibility
Is Your Smart Fridge a Scraper? New Data Uncovers Hidden Botnets
New data from Anubis' honeypot reveals a pervasive scraping problem, with nearly 90% of observed scraper IPs not on traditional threat lists. This global phenomenon is likely driven by compromised smart appliances, highlighting a hidden botnet threat. The findings underscore the need for advanced WAFs and user vigilance in securing IoT devices.

Build Your First Multi-Agent AI System with Python and LangGraph
Building Multi-Agent AI Systems: Plain Python vs. LangGraph As developers, we often tackle complex tasks by breaking them down into smaller, manageable pieces. This principle applies equally to AI systems, especially

How to Understand and Benefit from Kindle's User-Replaceable Battery
Learn how Kindle's upcoming user-replaceable battery design, driven by new EU laws, will enhance device longevity, ease repairs, and reduce e-waste for future models rolling out worldwide from Q3 2026.

How to Discover and Stream the Year's Top 10 Movies (So Far)
Discover and easily stream the top 10 most-watched movies of the year so far, based on JustWatch streaming data. Get descriptions, platforms, and tips for an optimal viewing experience in simple steps.
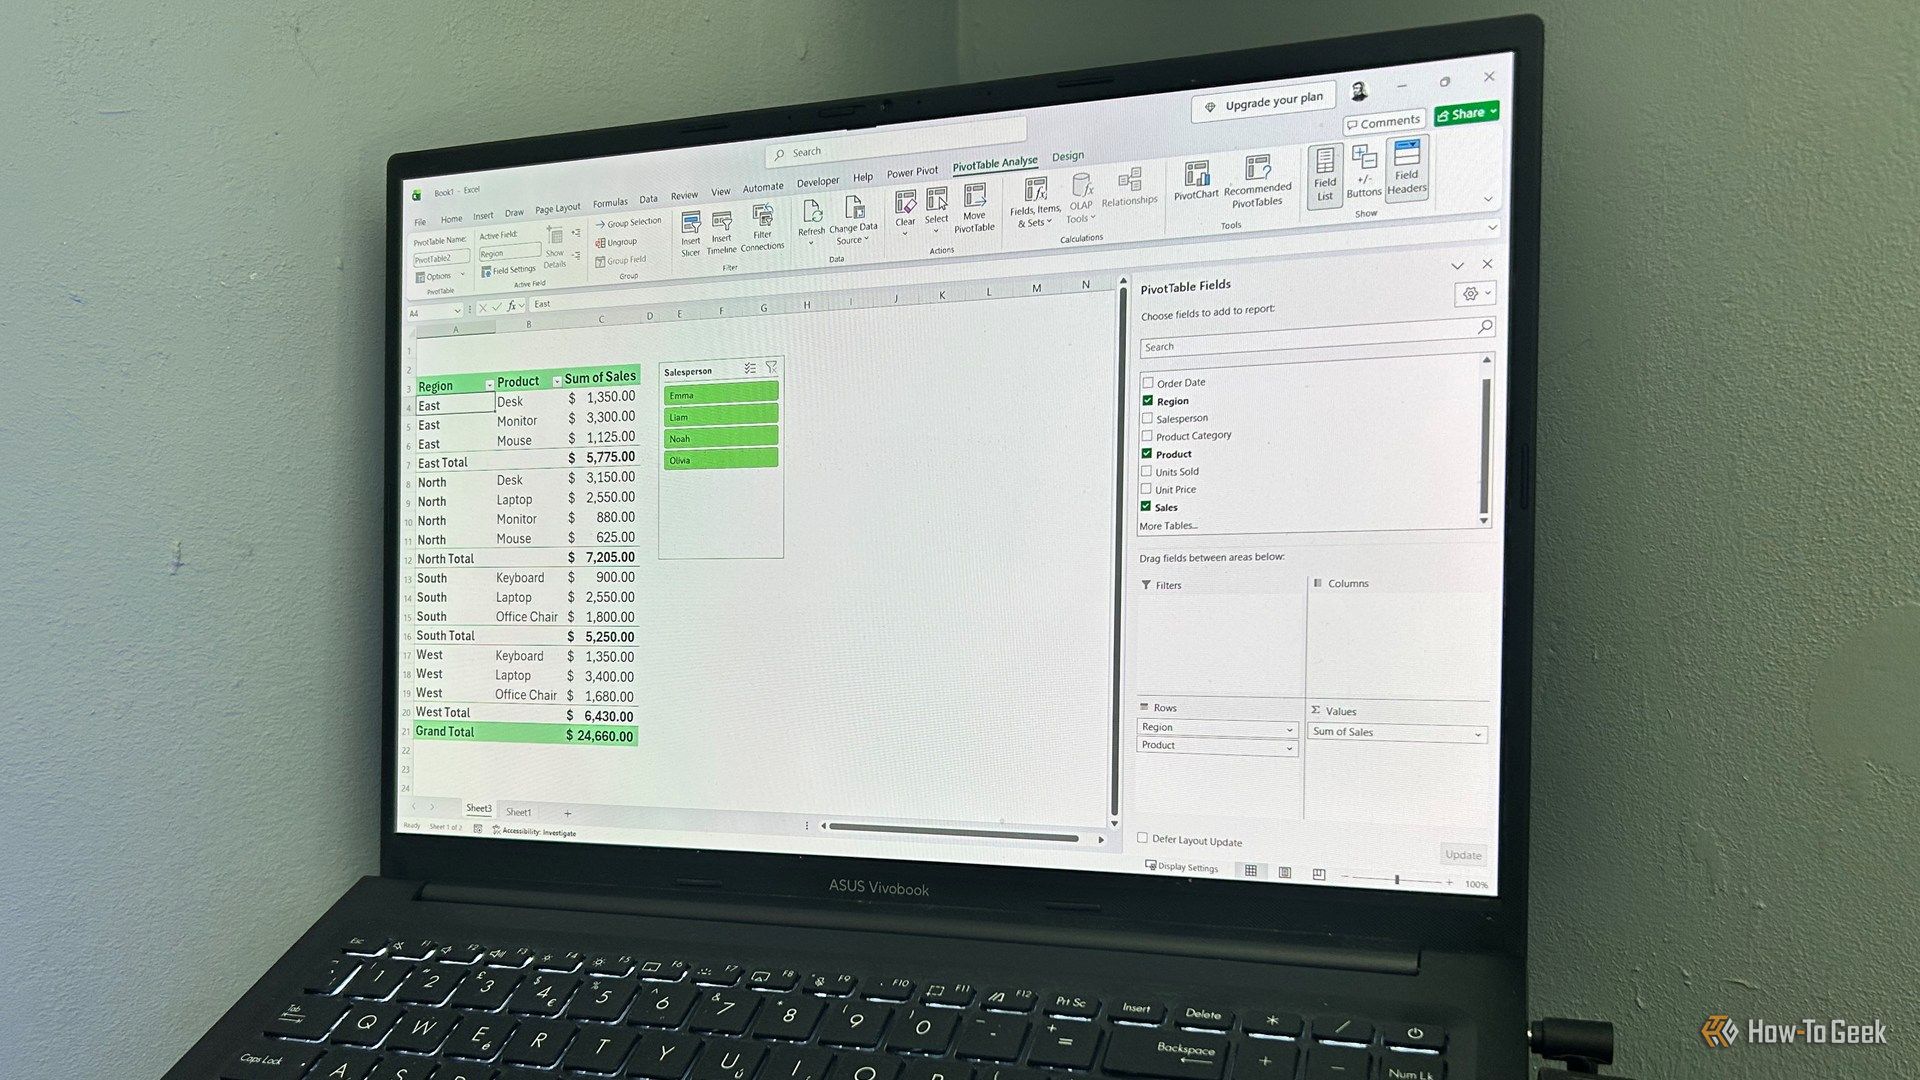
Master Excel PivotTables: Summarize Data with Ease
Learn to create, customize, and analyze data with Excel PivotTables in simple, step-by-step instructions. Discover how to prepare your data, use the PivotTable Fields pane, and apply interactive filters like slicers for instant insights. Gain control over large datasets and generate clear reports effortlessly.